

Building Agentic Applications With LangGraph
A hands-on introduction to LangGraph fundamentals and case study for customer support agents

This publication is by members of the Algorythm Community. A network of 20k+ black software engineers sharing technical insights across all fields of software development. Join us on LinkedIn, Facebook and Subscribe for more insights.
Introduction
Agentic AI is a powerful new paradigm that enables a new class of high-value applications. One of the first use cases to show immediate returns is customer support. We’ll explore how to build these systems using customer support agents as a case study, but the same core principles apply broadly across many domains.
Traditionally, customer agents read emails from customers, prioritised them, and followed up with required actions. Agentic AI can now support this initial triaging by summarising the email and preparing a draft response for human review to ensure customers receive rapid feedback. This saves time that would have been spent reading the original email, understanding it, and composing the response.
Furthermore, since there’s a human in the loop, the bot output is not customer-facing and is safe enough for quick deployment without the strict guardrails required for fully autonomous customer-facing applications.
This was the first Agentic AI application we deployed in my company, and it has proven popular among the agents it supports. In this tutorial, we’ll build a skeletal version of this application. We’ll start with a simple bot, add tool-calling capabilities, and finally add human review and feedback features.
LangGraph Overview
In order to build the application, one could code it from the ground up, but that would take a lot of time. Fortunately, there are several frameworks that handle much of the heavy lifting, allowing us to focus on the application development. The one employed in this tutorial is LangGraph, which provides a powerful framework for working with LLMs and building stateful, agentic AI applications.
The fundamental challenge solved by agentic AI frameworks is how to describe the various interactions within AI applications in a way that is both evolvable and scalable. LangGraph tackles this challenge using a graph-based workflow.
The practical application of graphs is ubiquitous — they are used in knowledge representation, social networks, recommendation systems, and more.
Technical interviews on data structures and algorithms (DSA) are rarely complete without questions involving graphs. In the context of agentic AI, graphs enable the execution of flowcharts with memory. They allow for modular implementation of agentic architectures and provide a structured framework for the flow of associated data.
LangGraph leverages graphs to develop an orchestration framework for the development, deployment, and management of stateful agents. It provides functionalities that enable efficient implementation of production-grade, stateful, and multi-agent workflows.
This tutorial will explore the different aspects of LangGraph with increasing levels of complexity, allowing the application to evolve gradually as new functionalities are added. This step-by-step progression will enhance comprehension and demonstrate the application’s growth through different stages of sophistication.
1. Building Munah: The Basic Agent
StateGraph
This is the fundamental structure that underpins stateful agent development within LangGraph. It models stateful agents as a graph of states and the transitions between them. It defines the flow of executions with proceedings depending on output or conditions. The structure enables the ease of developing debuggable stateful agents that can maintain context and memory.
State
The State serves as the working database of the graph. It is a temporary memory that holds all the context or data relevant to a graph execution. As the workflow progresses, the state dynamically updates to include inputs, conversation history, decisions, variables, and other intermediate information. This data is accessible to all nodes within the graph and ensures each component operates with the proper context. In essence, the State enables the graph to perform coherent and context-aware execution of its logic.
Nodes
This is the point at which the logic of the graph is executed. It serves as an action centre, enabling operations such as model invocation, function execution, database querying, and more. Each node receives the current State, modifies it, and passes the updated state to downstream operations.
Edges
Edges serve as the flow paths for information between nodes. They act as conduits through which the State moves across the graph. Edges can also be conditional, meaning the state of the workflow determines which path to follow. For example, if an LLM determines that a tool is needed to fulfill a request, the flow transitions to the ToolNode; otherwise, it proceeds to the next node.
With these components in place, the stage is now set to build our basic component for Munah.
Coding the Basic Workflow
Imports and Declaration
# import libraries
import logging
from dotenv import load_dotenv
from typing import TypedDict, Annotated
from langchain_groq import ChatGroq
from langgraph.graph import StateGraph, START, END
from langgraph.graph.message import add_messages
from langchain_core.messages import HumanMessage

# Setup logging
logging.basicConfig(level=logging.INFO)
logger = logging.getLogger(”customer_complaint_bot”)

# Load environment variables (for Groq API key)
load_dotenv()

# Initialize LLM (using Groq’s Llama 3.1)
llm = ChatGroq(model=”llama-3.1-8b-instant”, temperature=0)
Defining the State
The State is declared with variables we would need to hold the workflow data. The state inherits from TypedDict meaning we expect it to contain the declared keys.
class AgentState(TypedDict):
    “”“
    The state of our customer complaint agent.
    “”“
    # ‘add_messages’ is a special modifier that appends
    # new messages to the list, rather than overwriting it.
    messages: Annotated[list, add_messages]

    # The original customer email
    original_email: str

    # The final summary
    summary: str
Nodes declaration
The summarise_complaint node receives the email, sends it to an LLM and returns the summarised version.
def summarise_complaint(state: AgentState):
    “”“
    A node that takes the customer input from the state
    and generates a summary.
    “”“

    email = state[”messages”][-1].content
    logger.info(f”Summarising customer email: {email}”)

    prompt = f”“”
    You are an expert customer service agent. Please summarise the following
    customer complaint email concisely. Extract the core issue.
    Do not add any formatting.

    Email:
    {email}

    Summary:
    “”“

    response = llm.invoke(prompt)
    summary = response.content
    logger.info(”Summary generated successfully.”)

    # Return a dictionary to update the state
    return {”original_email”: email, “summary”: summary}
Note: This is an example prompt for instructional purposes. Prompt engineering and evaluation are out of scope for this article, but they are crucial for ensuring the accuracy and relevance of summarisations for your specific product and user base.
Graph definition
The components are now ready for building the bot. It will be done in four main steps. First the graph is declared, then nodes are added to the graph. This is followed by connecting the nodes with edges and finally, the graph is complied.
# Initialize the graph
customer_complaint_bot = StateGraph(AgentState)

# Add the nodes
customer_complaint_bot.add_node(”summarise”, summarise_complaint)

# Define the edges
customer_complaint_bot.add_edge(START, “summarise”)
customer_complaint_bot.add_edge(”summarise”, END)

# Compile the graph
app_stage1 = customer_complaint_bot.compile()
Graph Visualisation
It is instructive to visualise the current state of the graph. We will use pygraphviz with the script below:
from IPython.display import Image, display

# Get the graph object
graph = app_stage1.get_graph()

# Draw it as a PNG (returns raw bytes)
png_bytes = graph.draw_png()

# Display the PNG in the notebook
display(Image(png_bytes))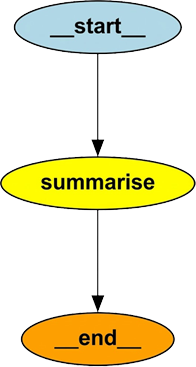
Running the Bot
# Define a sample complaint
complaint_email = (
    “Hi, I bought the ‘SuperWidget 5000’ (Order #A-12345) last week and “
    “it arrived broken. The screen is cracked. I tried calling support “
    “but was on hold for 45 minutes. This is unacceptable. I want a “
    “full refund and a return label.”
)

# Invoke the graph
# We pass the input as the ‘messages’ list
inputs = {”messages”: [HumanMessage(content=complaint_email)]}
result = app_stage1.invoke(inputs)

print(f”Summary: {result[’summary’]}”)
Final Output
Summary: The customer received a broken ‘SuperWidget 5000’ with a
cracked screen, was unable to get through to support after waiting 45 minutes,
 and is requesting a full refund and a return label.
Walkthrough
As a summary of the workflow above, let’s take a quick walkthrough of the sequence of events:
The graph is invoked with customer input
summarisenode takes in theState, extracts the input, interpolates it on the prompt, calls the llm with the prompt, gets a response and returns both the llm summary and the customer inputThe graph captures the
summarisenode output, merges it to theStateand returns theStateobject
We grab the State object, extract the summary from it and print it out. It is instructive to know that after each node returns, the graph updates the State object with the node output.
The main achievement of this first stage is that we learnt the fundamentals of LangGraph which are State, Nodes and Edges with a simple LLM interaction.
2. Adding Tool Calling and Conditional Flow
Having familiarised ourselves with the fundamentals, let’s move on to more advanced capabilities of the LangGraph framework.
When customer input requires the LLM to fetch additional context in order to generate a more relevant response, it needs to leverage a tool call. Fundamentally, tools are functions or APIs that allow the LLM to perform actions beyond text generation — such as database lookups, calculations, or external API interactions.
We’ll now evolve Munah by equipping her with tool-calling ability.
The main steps to implement this are:
Define the logic for the tool in terms of a function or API call.
Wrap the defined logic inside a ToolNode, which serves as the execution component in LangGraph.
Bind the tools to the LLM so that it is aware of them and can call them when needed.
Modify the prompt and workflow to instruct the LLM to use the tools when necessary.
In this tutorial, our imaginary customer will be asking questions about their order. The LLM will read the message, determine that it needs the order details, and call the appropriate tool to interact with the database. After retrieving the order details, it will summarise the email and prepare a draft response.
Both the summary and the response will then be passed to the customer support agent for review before making the final decision.
Let’s dive into the details.
Define the Tool
from langgraph.prebuilt import ToolNode, tools_condition
from langchain.tools import tool
from langchain_core.messages import SystemMessage, ToolMessage

# Define the logics (tool) to get order details
def get_order_details(order_id: str) -> dict:
    “”“Retrieve order details by order ID from mock database.
     ️Args:
        order_id (str): The order ID to look up.
    Returns:
        dict: A dictionary with order details.
    “”“
    logger.info(f”Retrieving details for order ID: {order_id}”)

    # Mock database
    mock_db = {
        “A-12345”: {”product”: “SuperWidget 5000”, “status”: “Delivered”, “price”: “£299”},
        “B-54321”: {”product”: “MegaWidget 2000”, “status”: “Shipped”, “price”: “£149”},
    }

    order = mock_db.get(order_id, {”error”: “Order not found”})
    return order

# Define the tool node
tools = [get_order_details] # More tools can be added as required
tool_node = ToolNode(tools=tools)

# Bind the tools to the LLM - ensuring LLM can call them
llm_with_tools = llm.bind_tools(tools)

# Redefine the summarise_complaint function to include tool usage
def tooled_summarise_complaint(state: AgentState):
    original_email = state.get(”original_email”) or state[”messages”][-1].content
    messages = state.get(”messages”, [])

    # Extract any tool responses so far
    tool_messages = [m.content for m in messages if isinstance(m, ToolMessage)]

    # Build the new LLM input
    llm_input = [
        SystemMessage(content=(
            “You are an expert customer service agent. “
            “Summarise the customer’s complaint and interpret any tool results below. “
            “Use the tool outputs to answer questions accurately. “
            “Always keep the original email context.”
        )),
        HumanMessage(content=original_email),
    ] + tool_messages  # <-- add all tool results here

    response = llm_with_tools.invoke(llm_input)
    print(f”LLM Response: {response}”)
    summary = response.content
    logger.info(”Summary generated successfully.”)

    # Return a dictionary to update the state
    return {”messages”: response, “original_email”: original_email, “summary”: summary}
Structure the graph
# build a new graph incorporating the tool node
customer_complaint_bot_with_tools = StateGraph(AgentState)
customer_complaint_bot_with_tools.add_node(”summarise_with_tools”, tooled_summarise_complaint)
customer_complaint_bot_with_tools.add_node(”tools”, tool_node)

# Define the edges with tool condition
customer_complaint_bot_with_tools.add_edge(START, “summarise_with_tools”)
customer_complaint_bot_with_tools.add_conditional_edges(
    “summarise_with_tools”,
    tools_condition,   # built-in condition to check for tool calls
)
customer_complaint_bot_with_tools.add_edge(”tools”, END)

#  Compile the new graph
app_stage2 = customer_complaint_bot_with_tools.compile()

# display the new graph
graph = app_stage2.get_graph()
png_bytes = graph.draw_png()
display(Image(png_bytes))
Run the Bot
# call the new graph with a new input that requires tool use
new_complaint_email = (
    “Hello, I ordered the ‘MegaWidget 2000’ with order ID B-54321 two days ago, “
    “but I haven’t received any shipping updates. Can you check the status of my order? “
    “Also, I want to confirm the price I was charged.”
)
new_inputs = {”messages”: [HumanMessage(content=new_complaint_email)]}
new_result = app_stage2.invoke(new_inputs)
print(f”New Summary with tools: {new_result[’summary’]}”)
Output
New Summary with tools: Understanding Why It Fails
The implementation above does not produce any output, and a quick look at the graph visualisation explains why. Figure 3 shows that the summarise_with_tools node either calls the tool or moves directly to the end node. When the tool is called, its output is not passed back to the LLM, which prevents the workflow from generating a final response.
We could print the tool output for inspection, but that would be of little use. The core issue is that the LLM never receives the tool’s result to complete the workflow.

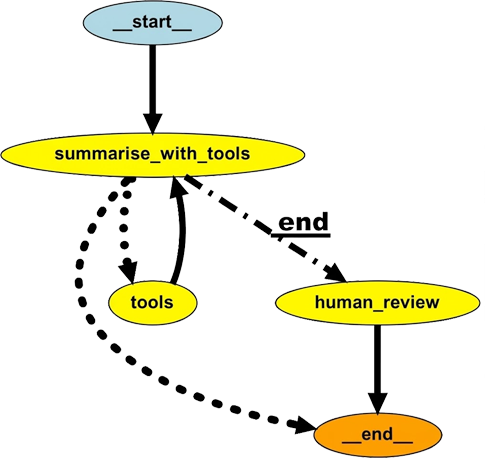
ReAct Pattern
The ReAct (Reason + Act) pattern enables the LLM to reason about its query and then act based on that reasoning. In the previous implementation, when the LLM decided to call a tool, the action was taken but the tool’s output was not passed back to the LLM. As a result, the model could not combine the user query and the tool response to generate a context-aware answer. To fix this, we need to modify the graph by adding an edge from the tool node back to the LLM node, allowing the LLM to continue reasoning with the new information and produce a more relevant response.
#  Add edge from tool node back to summarise node
customer_complaint_bot_with_tools.add_edge(”tools”, “summarise_with_tools”)

#  Compile the new graph
app_stage2 = customer_complaint_bot_with_tools.compile()

# Display the new graph
graph = app_stage2.get_graph()
png_bytes = graph.draw_png()
display(Image(png_bytes))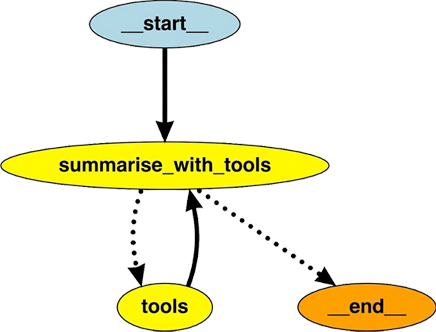
Let’s now try passing in our customer email and observe the output.
# call the new graph with a new input that requires tool use
new_complaint_email = (
    “Hello, I ordered the ‘MegaWidget 2000’ with order ID B-54321 two days ago, “
    “but I haven’t received any shipping updates. Can you check the status of my order? “
    “Also, I want to confirm the price I was charged.”
)
new_inputs = {”messages”: [HumanMessage(content=new_complaint_email)]}
new_result = app_stage2.invoke(new_inputs)


# Run the graph
new_result = app_stage2.invoke(new_inputs)

# Extract key parts
original_email = new_result.get(”original_email”)
summary = new_result.get(”summary”)

# Extract the latest AI message (final model output)
final_ai_msg = None
for msg in reversed(new_result.get(”messages”, [])):
    if msg.__class__.__name__ == “AIMessage” and msg.content.strip():
        final_ai_msg = msg.content
        break

# Extract tool results (if any)
tool_outputs = [
    msg.content
    for msg in new_result.get(”messages”, [])
    if msg.__class__.__name__ == “ToolMessage”
]

# Print formatted output
print(”\nOriginal Customer Email:”)
print(f”{original_email}\n”)

if tool_outputs:
    print(”Tool Output(s):”)
    for t in tool_outputs:
        print(f”  → {t}”)
    print()

if final_ai_msg:
    print(”Final AI Response:”)
    print(final_ai_msg)
else:
    print(”No final AI message found in result.”)
The formatted output is
Original Customer Email:
Hello, I ordered the ‘MegaWidget 2000’ with order ID B-54321 two days ago, but I haven’t received any shipping updates. Can you check the status of my order? Also, I want to confirm the price I was charged.

Tool Output(s):
  → {”product”: “MegaWidget 2000”, “status”: “Shipped”, “price”: “£149”}

Final AI Response:
Customer’s concern
The customer ordered the MegaWidget 2000 (Order ID B-54321) two days ago and has not yet received any shipping updates. They would like to know the current status of the shipment and confirm the amount that was charged.

Tool output interpretation
- Product: MegaWidget 2000
- Order status: Shipped
- Price charged: £149

Response
Hi there! I’ve pulled up the details for your order B-54321. Your MegaWidget 2000 has already been shipped, and the amount charged was £149.

If you’d like a tracking number or more detailed shipping information, just let me know and I’ll forward it to you right away. Otherwise, you should expect delivery shortly.

Thanks for reaching out, and feel free to ask if there’s anything else I can help with!
3. Human-in-the-Loop (HITL) and Persistence
Currently, Munah can understand customer correspondence and leverage available tools to provide contextual summaries and draft responses. To achieve full automation with human oversight, we can utilize two key LangGraph features: Interrupts and Persistence.
Human-in-the-Loop via Interrupt
The Interrupt feature allows pausing graph execution to enable human oversight, such as reviewing or editing Munah’s draft response. When an interruption occurs, the current graph state is stored and presented to a human for review. After the review, execution resumes from exactly where it stopped, incorporating any feedback provided.
State Persistence
By default, the graph state persists only during execution. LangGraph provides long-term persistence through the MemorySaver class, which allows the graph to preserve workflow context and resume without data loss.
We have added a node that implements the human review process, as shown below:
# Import
from langgraph.checkpoint.memory import MemorySaver

# Initialize the graph
customer_complaint_bot_with_tools = StateGraph(AgentState)

# Add the nodes
customer_complaint_bot_with_tools.add_node(”summarise_with_tools”, tooled_summarise_complaint)
customer_complaint_bot_with_tools.add_node(”tools”, tool_node)
customer_complaint_bot_with_tools.add_node(”human_review”, human_in_the_loop_review)

# Redirect flow:
# After summarising (with tools), send to human review before ending.
# Conditional: if the LLM requests a tool, go to tools; otherwise go to human review
customer_complaint_bot_with_tools.add_edge(START, “summarise_with_tools”)
customer_complaint_bot_with_tools.add_conditional_edges(
    “summarise_with_tools”,
    tools_condition,   # built-in LangGraph function that checks for tool calls
    {
        “tools”: “tools”,           # if tool call detected
        “__end__”: “human_review”,    # if no tool call, go straight to human review
    }
)
customer_complaint_bot_with_tools.add_edge(”tools”, “summarise_with_tools”)
customer_complaint_bot_with_tools.add_edge(”human_review”, END)

# Add a MemorySaver for Persistent State
memory = MemorySaver()

# Compile the new graph with MemorySaver as checkpointer
app_stage3 = customer_complaint_bot_with_tools.compile(checkpointer=memory)


# Visualize the Graph
graph = app_stage3.get_graph()
png_bytes = graph.draw_png()
display(Image(png_bytes))
Visualisation
Running the workflow
When the workflow is run, it will interrupt the flow and send the LLM output to a human. This can be implemented through a dashboard, web/app UI, API gateway or some other CRM platform. The human can choose to approve the draft response based on the original email and tool call output or they can modify the draft response.
# Run the graph with human-in-the-loop

# Use the same thread_id for continuity
config = {”configurable”: {”thread_id”: thread_id}}
new_inputs = {”messages”: [HumanMessage(content=new_complaint_email)]}

logger.info(”--- Starting workflow... ---”)
# This call will PAUSE at ‘human_review’ and return the current state
interrupted_state = app_stage3.invoke(new_inputs, config=config)

logger.info(”--- WORKFLOW PAUSED FOR HUMAN REVIEW ---”)

# --- Step 2: Show the human (you) what to review ---
# Get the AI’s draft response from the interrupted state
ai_draft = “”
for msg in reversed(interrupted_state.get(”messages”, [])):
    if msg.__class__.__name__ == “AIMessage” and msg.content.strip():
        ai_draft = msg.content
        break

logger.info(f”\n Original Email:\n{interrupted_state[’original_email’]}\n”)
logger.info(f” AI-Generated Draft:\n{ai_draft}\n”)

# --- Step 3: Get REAL feedback from the user via input() ---
logger.info(”---  WAITING FOR YOUR INPUT ---”)
logger.info(”Provide feedback/edits (or just press Enter to approve the draft as-is):”)
feedback_comment = input()

human_feedback = {}
if feedback_comment:
    # If you provided feedback, you must also provide the *new* summary
    print(”\nPlease provide the new, approved summary:”)
    approved_summary = input()
    human_feedback = {
        “approved_summary”: approved_summary,
        “comment”: feedback_comment
    }
else:
    # If you just pressed Enter, approve the original draft
    print(”---  No feedback provided. Approving original draft... ---”)
    human_feedback = {
        “approved_summary”: ai_draft, # Approve the original draft
        “comment”: “Approved as-is.”
    }

print(”--- Resuming workflow... ---”)
# We use invoke() again with the same thread_id to resume after human feedback
final_result = app_stage3.invoke(human_feedback, config=config)

# Display Final Results
logger.info(”\n Workflow Completed with Human Review\n”)
print(”Final Summary:”, final_result.get(”summary”), “\n”)

logger.info(”Conversation Messages:”)
for msg in final_result.get(”messages”, []):
    print(f”- {msg.__class__.__name__}: {msg.content}\n”)
Output
The output below shows that it is straightforward to modify the output from the LLM and this application greatly improve the customer support workflow.
## Final Summary: **Customer’s Complaint (summarised)**

The customer ordered the *MegaWidget 2000* (Order ID **B-54321**) two days ago and has not yet received any shipping updates. They would like to know the current status of the shipment and confirm the amount that was charged.

---

### **Interpretation of the Tool Output**
- **Product:** MegaWidget 2000
- **Order status:** **Shipped**
- **Price charged:** **£149**

---

### **Response**

Hi there,

Thank you for reaching out. I’ve pulled up your order details:

| Item | Detail |
|------|---------|
| **Product** | MegaWidget 2000 |
| **Order ID** | **B-54321** |
| **Current status** | **Shipped** |
| **Amount charged** | **£149** |

Your package has already left our warehouse and is on its way to you. You should receive a tracking number and further shipping updates within the next 24 hours. If you’d like me to send the tracking details right away, just let me know.

Please feel free to ask if you have any other questions or need further assistance.

Best regards,
**[Your Name]**
Customer Support Team
Conclusion
We have built a complete agentic bot, starting from a simple LLM call, then adding tool-call capability, and eventually including a human-in-the-loop. These are the fundamentals of modern agentic applications, and the agentic customer support AI bot we have built is a highly practical bot, suitable for adoption due to its quick wins and minimal risk of errors.
Gotchas
The
tools_conditionfunction is a routing mechanism. It takes the current state, inspects the last message inmessagesfor a tool-call request, and returns the appropriate tools and_end_if none are found. It will error if it encounters an unexpected structure. Without a routing map,tools_conditioncannot reliably decide which node to route to in cases of noisy or ambiguous input. It is therefore recommended to provide a routing map that explicitly instructstools_conditionon the correct path when no tool call is detected.The
stateobject serves as the main database during graph execution. Ensure that any data required by downstream nodes is returned to the state as soon as it is generated.
Next Steps
Phew! That was quite a journey through the basics of LangGraph, and it should get easier from here onward. I’ll keep this brief, but there are many possible extensions: for example, human feedback could be fed back into the LLM to refine its output, or tool calls could be implemented using MCP.
Before concluding, here are a few points often overlooked in tutorial applications: while learning is a key goal, one should also consider the ultimate aim — deriving real value from the application. Achieving this requires putting the application into production, which involves additional considerations such as safety, security, compliance, scalability, evaluation, cost, and more. For now, let’s enjoy exploring the new agentic capabilities provided by LangGraph.
About The Author

Kabiru Akande, PhD is an AI Engineering Manager with over a decade of experience leading the design and deployment of secure, scalable enterprise AI systems, with deep expertise in security, safety, infrastructure, and operations.
He holds a PhD in Signal Processing and Digital Communications from The University of Edinburgh and is an inventor with multiple granted U.S. patents in signal processing and communications. He is also a speaker and presenter on topics including AI engineering, wireless communications and academic career pathways. (full bio)