

Building A Game Boy Color Emulator in Rust
The Project That Changed How I Think About Computers

This publication is by members of the Algorythm Community. A network of 20k+ black software engineers sharing technical insights across all fields of software development. Join us on LinkedIn, Facebook and Subscribe for more insights.
Building an emulator made me a better engineer…

I’m a self-taught software engineer. Most of what I know about computers came from reading books and articles, watching YouTube videos, taking online courses, and, most importantly, building software.
That approach gave me momentum. It taught me how to learn quickly and how to get unstuck. But it didn’t always give me satisfying answers to why or how things worked the way they did.
A lot of my learning was reactionary. I learned what I needed when I needed it. If a concept came up at work, I’d dive in just far enough to solve the problem in front of me. That’s often the most practical way to learn, but it also meant there were entire areas of computer science I could avoid as long as things kept working.
Over time, I started to notice that some parts of my understanding felt vague. I could write correct code, but I wasn’t always confident I understood what was happening underneath it. I began to suspect that being more proactive and actively seeking out what I didn’t fully understand, would make me a better engineer, especially in harder situations or when writing more intentional, efficient systems.
So one day I went hunting for a challenging project, and I decided to build a Game Boy / Game Boy Color emulator… in Rust 🦀…
An emulator is hardware or software that enables one computer system to behave like another computer system; it’s a computer inside a computer. I wrote a software emulator.
I wrote about it in this post I made on LinkedIn. The gist of the post was that building an emulator was a challenging and fun project where I learned some of the following topics:
Endianness
Bit manipulations
CPU instruction sets & assembly
CPU instruction execution pipelines & interrupts
Disassembling bytes into assembly
Pixel Processing
Buses
RAM and ROM
I/O handling
Timing (polling vs scheduling)
What I didn’t fully explain in the LinkedIn post was why building an emulator mattered so much to me. That project forced me to slow down. It made gaps in my understanding of computer architecture impossible to ignore. It gave me a concrete way to push into other computer science topics like operating systems and database.
What Emulation Requires of You
Emulation gave me a way to ask the question What don’t I actually understand yet? by forcing me to model a system’s behavior directly.
When you write a web application, the rules of the machine are already in place. The hardware exists. Code execution is handled for you. You’re working inside a system whose behavior is defined ahead of time. The computer becomes a black box. You don’t care how it works internally, you care about the interface it exposes and whether it behaves as expected.
When you build an emulator, you don’t get that luxury. You have to build the black box itself.
The system you’re emulating has a fixed, real behavior. Your task is to reproduce that behavior accurately. Very quickly, vague ideas about computers turn into concrete questions:
How does the CPU execute instructions, and in what order?
Where does state live, and when does it change?
How does data move between components?
At a basic level, something has to fetch and execute instructions. Something has to hold memory. Something has to represent I/O components (timers, graphics, sound, input). Something has to move data between all of them.
An emulator is a system where every step depends on the last one. It’s a state machine. The next state depends on the current state, and the current state depends on the previous one. There’s no room to reinterpret mistakes as design choices. If one part of your model is wrong, the effects propagate.
Bugs show up in subtle but unforgiving ways. A misunderstood instruction can alter control flow. A small timing error can change observable behavior. A mistake in how memory is modeled can corrupt state long before anything crashes. Often, nothing fails loudly. Things just stop behaving like the machine you’re trying to emulate.
Building an emulator forces me to engage directly with structure, causality, and behavior, the fundamentals that drive both hardware and software systems.
Modeling The Structure
Let’s take a peek at some code and ideas to get a taste of the structure, causality, and behavior I mentioned.
CPU
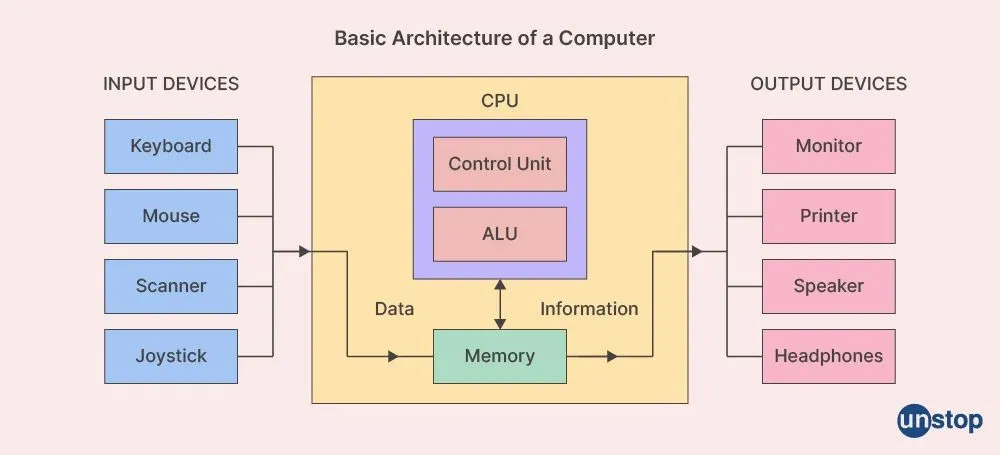
At the center of a computer, and by extension, an emulator, is the Central Processing Unit (CPU). The CPU has access to the bus and registers. Registers are quick data storage that the CPU uses to know what it wants to do next. The cpu uses a special register called the program counter to retrieve the next instruction; the program counter is like an index into the memory that tells the CPU where it is in the executing program.
The CPU’s main goal is to fetch, decode, and execute instructions continuously and every time it does those actions; it completes a cycle.
struct Cpu {
    bus: Bus,
    registers: [u8; 5],
    program_counter: u8,
}

impl Cpu {
    //...

    fn cycle(&mut self) {
        // Fetch
        let instruction = self.fetch_instruction(self.program_counter);
        // Decode
        let instruction_type = self.decode_instruction(instruction);
        // Execute
        match instruction_type {
            Add => self.add_instruction(instruction),
        }
    }

    //...
}

fn main() {
    //...
    loop {
        // something signaled to interrupt the cpu
        if bus.interrupt_pending() {
            bus.handle_interupt() // clear interrup and unblock CPU
        }

        cpu.cycle()
    }
}
The cpu cycles until the program ends, something halts it, or until an interrupt is triggered. An interrupt is an external signal that tells the CPU something needs attention before continuing.
Memory
Memory is where state lives. It’s where programs live, data lives, and results are stored. The CPU relies on memory to keep track of instructions, data, and previous computations. Every read and write goes through memory. Without it, there is no persistent state for the system to operate on. We treat memory like an array of bytes
Usually when speaking about memory we are talking about, Random Access Memory (RAM). However, there is also Read Only Memory (ROM), usually from external memory devices like CDs or Cartridges.
Bus
The bus is how everything communicates. Instruction fetches, data reads and writes, addresses, and interrupt signals all move across it. It’s not glamorous, but it’s what allows the CPU, memory, and devices to coordinate with each other.
struct Bus {
    ppu: Ppu,
    cartridge: Cartridge,
    interrupts: Interrupts,
}

impl Bus {
    fn read_8(&self, address: u16) -> u8 {
        match address {
            // Other components
            0x8000..=0x9FFF => self.ppu.read_8(address),
            0xC000..=0xFDFF => self.memory.read_8(address),
            // Other components
            0xFFFF => self.interrupts.read_8(address),
            _ => 0xFF,
        }
    }

    fn write_8(&mut self, address: u16, value: u8) {
        match address {
            // Other components
            0x8000..=0x9FFF => self.ppu.write_8(address, value),
            0xC000..=0xFDFF => self.memory.write_8(address, value),
            // Other components
            0xFFFF => self.interrupts.write_8(value),
            _ => {}
        }
    }
}
We can represent the Bus as a match that routes to different components based on the read and write address.
I/O Devices
Devices are everything that isn’t the CPU. Timers, graphics hardware, sound hardware, controllers, and input devices are how time passes, pixels appear, and user actions matter. Devices are also how the outside world signals the CPU through interrupts that something has happened and needs to be handled.
I’m leaving out quite a bit here, intentionally. The goal isn’t completeness. It’s clarity. If you understand these pieces, you have enough of a mental model to start learning about emulators and computer architecture. Everything else builds on this foundation.
What’s to Come
This post is the first in a series about computer architecture concepts, using emulation as the guide. This won’t be a formal tutorial on how to write an emulator, but I will explore some of the topics that go into building one.
Next time we’ll start with the CPU and go into depth on instruction execution, then move to time, then memory, then devices like pixel processors. Finally, we’ll look at how all of these pieces interact to produce the systems we recognize.
You don’t need to understand everything at once. Each article will introduce one piece and we’ll drive it home.
By the end of this series, you won’t magically know everything. But you will have gained trust in your understanding. Debugging should feel less mysterious. Low-level systems should feel less intimidating. And the abstractions you use every day should start to make more sense.
If that sounds useful, let’s keep going! Thanks for reading!
About the Author

Aza Walker is a Software Engineer, fascinated with the systems that make modern computing possible. If he’s not coding he’s listening to music, playing video games, or watching anime. Aza currently works at ShipBob as a Senior Software Engineer, where he focuses on developing scalable microservices.
Excellent breakdown of why emulation is such a powerful learning tool. The idea that building an emulator forces yu to model behavior directly rather than work inside abstraction layers is spot on. I tried something similar with a simple 8-bit CPU simulator and the moment instructions started executing in the wrong order really made me understand fetch-decode-execute at a level no textbook could.
More of this👏👏